Selecione as opções apropriadas abaixo para determinar a iluminação de polarização de tamanho correto para seus monitores
Qual é a proporção da tela?
Qual é o tamanho da tela (este é o comprimento de sua medida diagonal)
polegadas
Você deseja colocar as luzes em 3 ou 4 lados da tela (Leia nossa recomendação nesta página Calculadora de comprimento MediaLight e LX1 se você está tendo problemas para decidir).
Este é o comprimento real que é necessário:
metros
Você deve arredondar para esse tamanho de luz de polarização (você pode arredondar para baixo a seu critério se as medidas reais e arredondadas estiverem muito próximas. Geralmente, é melhor ter mais do que muito pouco):
Instale apenas um dimmer por MediaLight ou LX1. Eles não funcionarão corretamente até que um seja removido
Reduza o risco de danos ao seu novo LX1. * Leia este guia de instalação e assista ao breve vídeo de instalação para se divertir durante anos.
* (Obviamente, se o seu LX1 quebrar durante a instalação, ele está coberto pela garantia de 1 anos do LX2, mas levará alguns dias para que possamos enviar as peças de reposição para você).
As tiras de cobre puro em seu LX1 são excelentes condutores de calor e eletricidade, mas também são muito macias e podem rasgar com muita facilidade.
Deixe os cantos ligeiramente soltos e não os pressione para baixo. (Não causará nenhuma sombra e as luzes não cairão). Comprimir os cantos pode fazer com que eles, ocasionalmente, se rasguem. Ok, com isso resolvido, por favor, veja nosso vídeo de instalação.
Observação: enquanto estamos trabalhando em nosso vídeo LX1, estamos exibindo o vídeo de instalação de nossos produtos MediaLight. O processo de instalação é essencialmente o mesmo, embora alguns recursos sejam diferentes entre os produtos.
O LX1 não inclui adaptador, cabo de extensão, presilhas ou dimmers, que são vendidos separadamente.
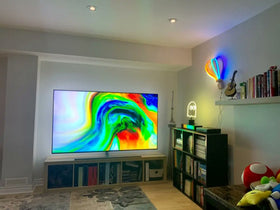
Ao instalar o novo LX1 em seu monitor, se você estiver movendo em torno de 3 ou 4 lados, por exemplo, quando seu monitor está montado na parede:
1) Meça 2 polegadas da borda da tela.
2) Comece subindo pela lateral da tela no lado mais próximo da porta USB, começando pelo POWER (plug) END da tira.
Isso tornará mais fácil cortar qualquer comprimento excedente quando terminar. Se o seu monitor não tiver uma porta USB, comece a subir no monitor no lado mais próximo da fonte de alimentação, seja um filtro de linha ou caixa externa, como encontrado em alguns monitores. Se estiver diretamente no centro, jogue uma moeda. :)
Suas luzes são cobertas por uma garantia abrangente de 2 anos e nós cobrimos instalações malfeitas, então não se estresse muito. Se você bagunçar o LX1, entre em contato conosco.
Se você precisar cortar um comprimento extra de uma tira, pode cortá-la na linha branca que cruza cada par de contatos. Corte na linha abaixo:
Isso deve cobrir tudo para instalações quando o monitor está em um pedestal ou suporte de parede.
Se a sua tela tiver superfícies irregulares na parte traseira (ou seja, as "saliências" LG ou Panasonic OLED), é melhor deixar um espaço de ar e abranger esse espaço em um ângulo de 45 ° do que seguir os contornos do display. (Eu sei que parece que esta ilustração foi feita por uma criança de 12 anos).
Se você seguir contornos mais severos, onde os feixes de LED estão voltados um para o outro, você pode acabar com uma "ventilação" ou uma visão recortada dessas posições. Não afeta a eficácia, mas a auréola não parecerá tão lisa quanto poderia. Isso também mantém o halo bom e consistente em montagens de parede niveladas. Se você estiver mais longe da parede, ventilar não é tão comum.
Se você está lendo isso e está totalmente perplexo, não se preocupe. Contacte-me através do nosso chat (parte inferior direita desta página). Estarei adicionando mais fotos e vídeos nos próximos dias. Vamos colocar seu LX1 em operação em um piscar de olhos.
Jason Rosenfeld Laboratórios Cênicos Fabricantes de iluminação polarizada LX1, MediaLight Bias Lighting e